This article is part of this article series:
API Best Practices - IntroductionGood to know: Please find the complete description of purchase transactions here:
https://accounting.twinfield.com/webservices/documentation/#/ApiReference/Transactions/PurchaseTransactionsGood to know: Please find the complete description about suppliers here: https://accounting.twinfield.com/webservices/documentation/#/ApiReference/Masters/Suppliers
Good to know: There are five transaction type categories. These are sales, purchase, bank, cashbook, and journal. This article will only explain how to import purchase transactions.
In this article, we'll explain how you can import purchase transactions into Twinfield. We ask you to follow this best practice because it supports our Fair Use Policy. You can read about our Fair Use Policy here:
https://accounting.twinfield.com/webservices/documentation/#/GettingStarted/FUPGood to know: There is a Postman collection in the attachment of this article with ready-to-use examples of the steps that are mentioned in this article.
Good to know: If you need to post to a cost center or a project then you can follow steps 1 to 3 below for downloading, adding, and updating suppliers. Suppliers are dimension type CRD, cost centers are KPL and projects are PRJ.
The process of importing purchase transactions has seven steps:
- Download all suppliers that currently exist in Twinfield
- Update the dimension type mask
- Add or update suppliers into Twinfield
- Find the available transaction types
- Find the available profit-and-loss ledgers
- Find the available vat codes
- Import new purchase transactions
Download all suppliers that currently exist in Twinfield
To make sure that the starting point in both your software and Twinfield with relation to supplier data is the same it is advised to download all suppliers that currently exist in Twinfield. You can do this by downloading the initial load that is described in this article:
Keeping a shadow database with customers/suppliers
Confirm that the end-user has configured the dimension type for suppliers in Twinfield
Twinfield can be configured to allow only certain codes for suppliers. For example codes in the range from 2000 until 2999. To make sure that each supplier has a unique code in Twinfield, the end-user must configure this range in the user interface of Twinfield.
Important: It's important that you let Twinfield decide the code for each new supplier. This is to avoid the scenario where multiple connected software applications use the same supplier code for different suppliers.
The end-user can read this knowledge article to learn how to do this in Twinfield: Beheer administraties - Dimensietypen
Add or update suppliers into Twinfield
Add or update suppliers into Twinfield. You can use the request named ‘Add or update suppliers into Twinfield’ in the Postman collection in the attachment of this article.
Good to know: For adding or updating cost centers or projects, use the request named 'Add or update cost centers or projects' in the Postman collection.
Important: Please follow the best practice by limiting the number of suppliers to 25 at a time.
 Important:
 In case a supplier already exists in Twinfield, then Twinfield will first delete all existing addresses and banks of the supplier when you use <addresses> or <banks> in the XML request. After they are deleted, Twinfield will only add the addresses and banks that you provided in the XML request.

Find the available transaction types
To make sure that you are sending the purchase transactions to the correct transaction type in Twinfield you must request the available purchase transaction types first. A company in Twinfield can have multiple purchase transaction types.
To request the available transaction types you can use the Postman collection in the attachment of this article, specifically the request ‘Find the available transaction types’.
Important: Please follow the best practices below while finding the available purchase transaction types.
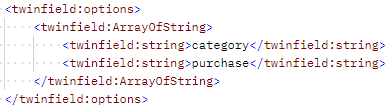
1. Limit the number of transaction types to 25 at a time. You can use the firstRow and maxRows parameters for this.

2. Only request the transaction types that are of the category purchase.
Find the available profit-and-loss ledgers
Make sure that you are sending the purchase transactions to the correct profit-and-loss ledgers in Twinfield by requesting the available codes first. To request the available ledger codes you can use the Postman collection in the attachment of this article, specifically the request ‘Find the available profit-and-loss ledgers’.
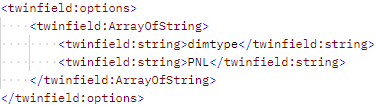
Important: Limit the number of codes to 25 at a time. You can use the firstRow and maxRows parameters for this.
Important: Only request the dimtype PNL.
Find the available vat codes
Make sure that you are sending the purchase transactions to the correct vat codes in Twinfield by requesting the available vat codes first. To request the available vat codes you can use the Postman collection in the attachment of this article, specifically the request ‘Find the available vat codes’.
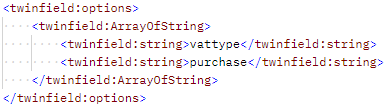
Important: Limit the number of codes to 25 at a time. You can use the firstRow and maxRows parameters for this.
Important: Only request the vat type purchase.
Import new purchase transactions
To import new purchase transactions into Twinfield you can use the Postman collection in the attachment of this article. You can use the request named ‘Import new purchase transactions’.
Important: Please follow the best practices below while importing new purchase transactions.
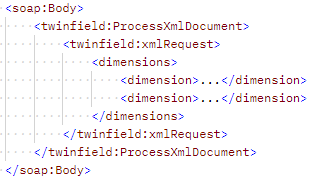
1. Limit the number of transactions to 25. You can insert multiple <transaction> blocks into <transactions>.

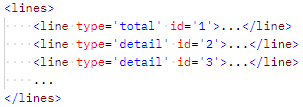
2. Limit a purchase transaction to a maximum of 500 detail lines.
3. It's recommended to:
- set the attribute 'destiny' to 'final' to prevent differences between your software and Twinfield.
- set the attribute 'autobalancevat' to 'true' to avoid rounding errors in the vat.
- set the attribute ‘raisewarning’ to ‘false’ to make sure that data from your software is leading.


